



I’ve been using VS Code workspaces at work to bring multiple existing repositories together, and honestly, it’s been awesome. It’s one of those features that’s been around for a while, but it becomes especially useful when you start working with AI coding assistants like Claude.
The problem I’m trying to solve is pretty common: I have a UI in one repository, an API in another, and sometimes a few other services or tools that all work together. I want to work across all of them without moving everything into a monorepo.
And I want Claude to have the same bigger-picture view that I do.
One workspace, multiple repositories
VS Code has a feature called a multi-root workspace. Instead of opening just one folder, you can add several folders to the same VS Code window and save the setup as a .code-workspace file.
For example, my directory structure might look like this:
development/
├── my-project.code-workspace
├── ui/          # its own Git repository
├── api/         # its own Git repository
└── shared-lib/  # another Git repository
And the workspace file can be surprisingly simple:
{
  "folders": [
    { "name": "UI", "path": "ui" },
    { "name": "API", "path": "api" },
    { "name": "Shared Library", "path": "shared-lib" }
  ],
  "settings": {}
}
Open my-project.code-workspace in VS Code, and all three projects show up in the Explorer.
The best part? Nothing about your Git repositories has to change. Each repository keeps its own history, branches, pull requests, permissions, and deployment pipeline. VS Code is simply giving you one place to work with them.
That’s exactly what I want. I don’t need to restructure our source control just to make day-to-day development easier.
Why this is especially useful for API + UI development
Say I’m building a feature that needs changes to both the frontend and backend.
Normally, I might have two VS Code windows open, bounce between them, and constantly explain how the API response maps to the UI. With a multi-root workspace, both codebases are in the same window.
I can search across the workspace, navigate between projects, and see each repository in Source Control. It’s still two separate repositories; it just feels like one connected development environment.
One of my favorite little things is Ctrl+P (Cmd+P on Mac). VS Code’s Quick Open lets me type a filename and jump straight to it, whether it’s in the UI or API repository. I don’t have to think about which VS Code window has the file open. I can pull up a frontend component, then jump right to the backend endpoint or service that supports it. And if I want to see both at once, I can open them side by side in split editors.
It’s a tiny workflow improvement that adds up throughout the day. Instead of treating the frontend and backend as disconnected projects, I get to work on the whole feature in one place. More context for me, more context for teammates, and—when configured to access the right folders—more context for Claude.
That alone is a nice productivity improvement. But adding Claude is where things get really interesting.
VS Code workspaces vs. Claude’s own project context
Claude has its own ways of organizing context. For example, Claude Projects can hold project-level instructions and reference material, while Claude Code can work with files in your development environment.
Those are useful, but they’re not quite the same thing as a VS Code multi-root workspace:
| VS Code multi-root workspace | Claude project / Claude Code context | |
|---|---|---|
| Main purpose | Organize multiple local folders in one editor | Give Claude instructions, context, and access to relevant code or tools |
| Multiple repositories | Yes, as separate folders | Depends on which Claude product and how access is configured |
| Git boundaries | Each repository stays independent | Doesn’t change repository boundaries |
| Sharing | Commit a .code-workspace file | Share supported project instructions or commit CLAUDE.md files |
| MCP integrations | Configured through compatible tools/extensions | Claude Code can use configured MCP servers |
They’re complementary, not competing features. A VS Code workspace tells my editor which folders belong together. Claude’s instructions and tooling help the assistant understand how to work across them.
One important detail: opening folders in a VS Code workspace does not automatically guarantee Claude can read all of them. That depends on the Claude integration you’re using and its file-access configuration. I always verify the assistant can actually see the folders I expect.
Taking it further with Claude files and MCP
What I’m working toward is a single development setup that brings together more than just source code:
- The UI and API repositories
- Shared libraries or related services
- Claude instructions about how the pieces fit together
- MCP integrations, including tools like Figma
Imagine asking Claude to look at a Figma design, inspect the existing UI components, and understand the API contract—all as part of the same workflow. That’s the direction I’m excited about.
I also like keeping reusable instructions in version control. A CLAUDE.md file can explain architecture, conventions, commands, and how the different services relate. Claude Code can use these files as project guidance.
For a team, that means the useful context doesn’t have to live only in one developer’s head or one person’s chat history.
You can review changes to the instructions through GitHub, improve them over time, and share them with other developers.
A practical way to share the setup
One approach is to create a small, separate workspace configuration repository containing a .code-workspace file, documentation, and shared Claude configuration.
For example:
team-workspace/
├── project.code-workspace
├── CLAUDE.md
└── README.md
That repository can describe which other repositories to clone and where to put them. The workspace file then points at those local folders using relative paths.
The important distinction is that the workspace file references the repositories; it doesn’t clone them for you. A teammate still needs to check out the repositories in the expected locations (or adjust the paths).
Likewise, a top-level CLAUDE.md is only useful if your Claude setup actually loads it. With Claude Code, instruction discovery depends on the working directory and project configuration, so it’s worth testing instead of assuming every file in the VS Code workspace is automatically included. Repository-specific CLAUDE.md files can live in their respective repositories as well.
For MCP, share safe configuration where your tools support it, but keep API keys, tokens, and other secrets out of Git. Each teammate should authenticate using their own credentials and have access only to the repositories and services they need.
This isn’t a monorepo, and that’s the point
I’m not against monorepos. They make sense for plenty of teams.
But sometimes your repositories are separate for good reasons: independent deployment, ownership, access controls, or simply because that’s how the systems have evolved.
A multi-root workspace gives you a unified working experience without requiring a unified repository.
You get the convenience of working across the whole feature while keeping the existing architecture and Git workflows intact.
My takeaway
I’ve been using this approach successfully at work, and it’s quickly becoming one of my favorite ways to organize development.
VS Code workspaces are already useful on their own. Pair them with Claude, version-controlled instructions, and MCP tools, and they start to feel like a lightweight hub for your entire development workflow.
I’m still experimenting with how much I can bring into one setup—especially things like Figma MCP—but I love the idea that a teammate could clone a small workspace configuration repository, open one file, and have a shared starting point for working across all the services.
One workspace. Multiple repositories. No monorepo migration required.
If you haven’t tried VS Code’s multi-root workspaces yet, give them a shot.
VS Code multi-root workspace documentation · Claude Code memory and instructions · Model Context Protocol
Remember the Windows 98 Mystify screensaver? I used to stair at when I was young, the colorful outlines bouncing around a black screen, stretching into different shapes and leaving trails behind them. Such a simple thing, but surprisingly fun to watch.
I wanted to see if I could recreate that feeling in JavaScript using PixiJS. Here’s my version:
See the Pen Windows 98 Screensaver by Andy Sciro (@spssciro) on CodePen.
I built this before I was using AI to help write code, so figuring it out was more challenging. Working through it myself was very fun though, and seeing the effect finally come together was especially satisfying.
The idea behind the animation is pretty small: give five points their own directions, move them each frame, and reverse their horizontal or vertical direction when they cross an edge. Connect the points with lines and close the shape.
The trails are the interesting part. Each point keeps a short history of its positions. On every tick, the drawing is cleared and the shapes are redrawn from that history, so you see earlier outlines following the newest one. The colors gradually shift using sine waves.
There are controls in the Pen for speed, the number of outlines, and line thickness. Try changing them and see how different the same little animation can feel.
This reminds me of why I enjoy small JavaScript experiments. You start with something familiar, figure out the pieces that make it work, and suddenly you’ve got a little bit of nostalgia running in the browser.
As always, feel free to open the source on CodePen and fork it! If you like this kind of thing, I also made a bouncing DVD logo in Pixi.js.
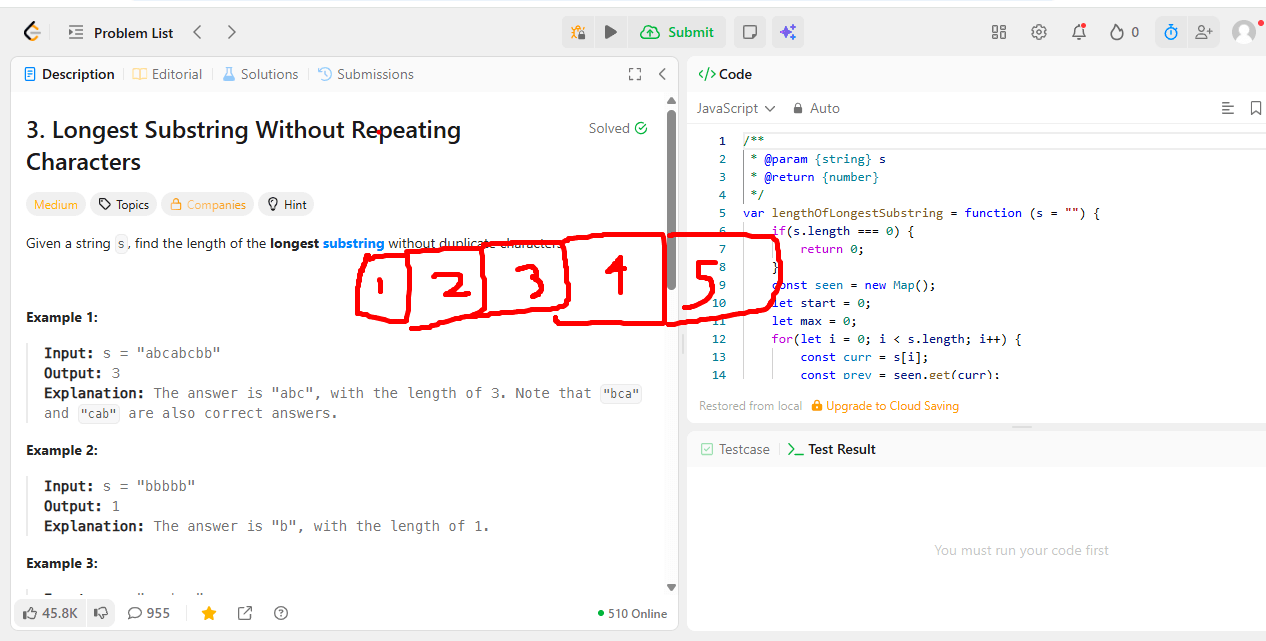
I’ve always loved Zoom’s drawing/annotate feature when screen sharing. Being able to circle something, underline a line of code, or draw an arrow while explaining it out loud just makes communication so much clearer than pointing with a cursor.
The thing is, I only get that feature inside an actual Zoom call. I kept wishing I could pull up the same kind of drawing tool anywhere on my screen, not just during a screen share. This comes up a lot when I’m doing LeetCode problems and want to circle a variable, cross out a branch, or draw arrows tracing through an algorithm while I think.
Turns out Microsoft already solved this years ago with ZoomIt, part of the Sysinternals suite. It lets you zoom into any part of your screen and draw directly on top of it with keyboard shortcuts, no screen share required.
A few things I like about it:
- Works completely with keyboard shortcuts, so it doesn’t get in the way of whatever you’re doing.
- Super lightweight, just a single small executable.
- Zoom and draw anywhere on the desktop, not tied to any specific app.
Definitely adding this to my toolbox for talking through LeetCode solutions and just generally annotating things on screen.
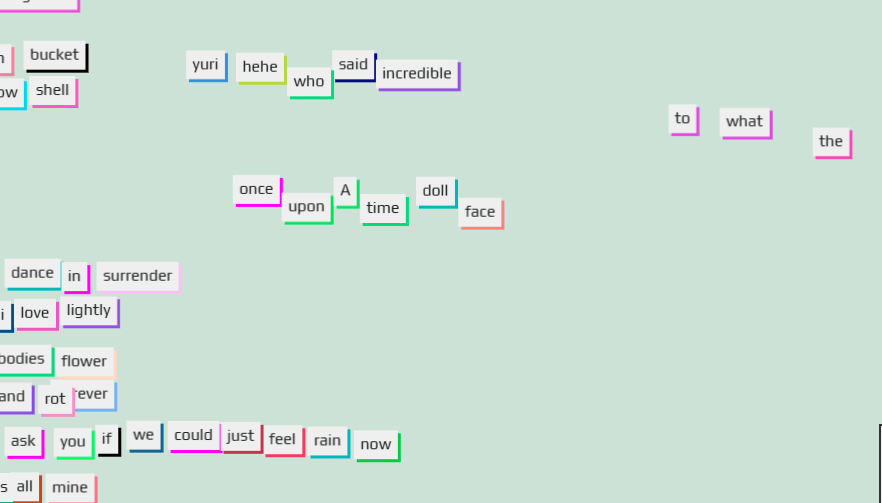
Found this cool library called Playhtml. It lets you drop a few attributes into your HTML to make elements draggable, spinnable, growable, and more, with the state synced live across everyone viewing the page.
One of my favorite demos is the fridge magnets page, it’s a shared magnet poetry board anyone visiting can rearrange in real time.

Lately I wanted to try Blender’s MCP connector with Claude. If you haven’t heard of MCP (Model Context Protocol), it’s essentially a standard way to let an AI assistant like Claude talk to and control other applications, in this case, Blender.
The idea is pretty wild when you think about it: instead of manually clicking around Blender’s UI to model, position, and texture objects, you can just describe what you want in plain English and let Claude drive the actual application through the MCP server.
Here’s a quick video on it:
I’m curious to dig in more and see how far this can go for actual 3D work versus just being a neat demo.
Requirements:
Steps to set it up:
- Install Blender.
- Install the Blender MCP server.
- Install Claude.
- Connect the Blender MCP server to Claude so it shows up as an available tool.
- Open a scene in Blender and start prompting Claude to create, move, or texture objects.
The prompt I used was: “In blender can you make a strawberry donut with rounded sprinkles. Zoom out so its in view - no other object should be present”
It works alright here and there, but the real value for me is using plain language to tweak settings easily in Blender. Blender’s UI is massive, so doing things like “mirror these vertices across the x axis,” “xray this,” or setting up reference images has been the most useful part.
One gotcha: after turning on the MCP server, I really had to ensure Claude was NOT running. I exited the process via Task Manager. Blender and Claude both said everything was connected and running fine, but until I fully restarted/exited Claude it kept timing out. A full restart is what actually got it working.
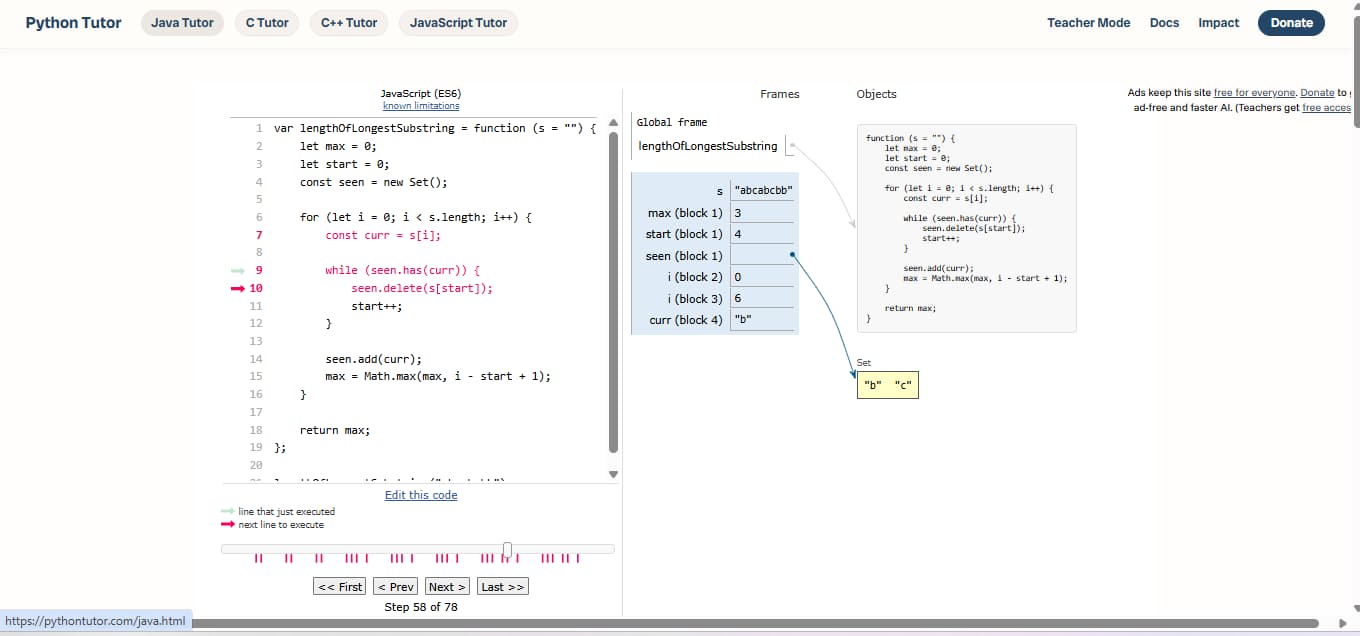
Recently I was having trouble understanding some code. Specifically it was a leetcode solution that even though I read the solution a few times and watched a video it wasn’t sticking.
I came across this Python Tutor and pasted in a leetcode solution and pressed play. It scans the code and generates a visual debugged view of it! It’s also free and didn’t even require a signup. What I was most impressed with was the way it handled objects and recursion.
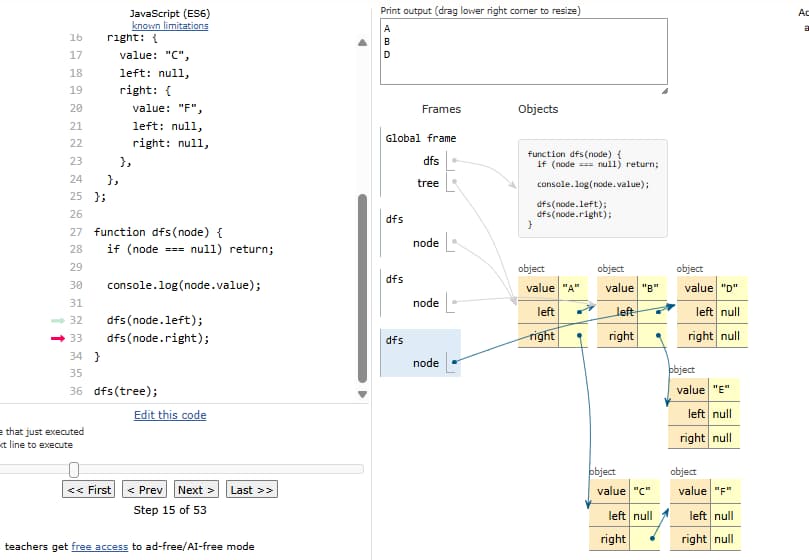
Give it a try at pythontutor.com and it’s not just for JavaScript, it also supports Python, C, C++, and Java.
I stumbled across a GitHub project called Caveman, and the idea made me laugh. It’s an AI skill with a simple goal: make the assistant talk less.
Not by making it dumb, or having it say “me fix code” all day. It strips out the usual AI pleasantries and filler while keeping the important technical details intact.
Instead of:
Sure! I’d be happy to help you investigate that issue. Based on the code you’ve shared, it looks like…
You get something closer to:
Bug in auth middleware. Check token expiry comparison.
That’s pretty much the whole idea, and I kind of love it.
Less talking, fewer tokens
The interesting part is that this can actually save output tokens. AI responses are made of tokens, and many APIs charge for the tokens a model generates. Shorter answers can mean lower output costs, especially if you’re using an assistant constantly while coding.
Caveman’s rules are more thoughtful than the name suggests. Keep code, commands, paths, numbers, errors, and negations exact. Remove ceremony, not meaning. It even says not to force fake caveman grammar.
Of course, shorter isn’t always better. Ambiguous instructions or missing technical details can cost much more than the few tokens you saved. And the skill itself takes some context to load, so there’s no guarantee every single interaction uses fewer total tokens.
Still, there’s something funny about needing an entire set of instructions to tell an AI to stop talking so much.
Less fluff. Same useful answer. Potentially fewer tokens.
Check it out on GitHub: JuliusBrussee/caveman.
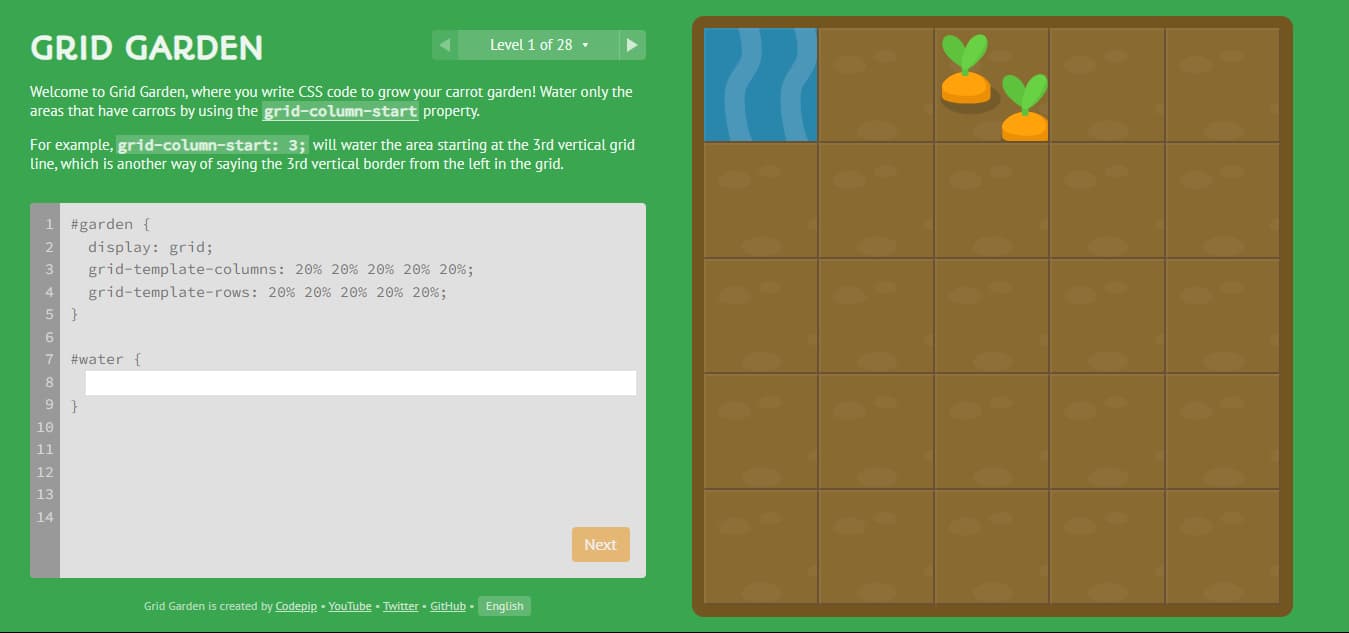
CSS Grid is a CSS layout module that enables two-dimensional layout. CSS Grid is CSS’s newest layout module and has been designed to create flexible and responsive layouts. While it can be difficult to learn CSS Grid due to its new syntax and layout ideas, the rewards are worth it. With CSS Grid, you can create grid-based layouts with CSS, which means that your layouts will be more flexible and responsive. In addition, CSS Grid is well supported by modern browsers, so you can be sure that your layouts will look great on all devices. So if you’re looking for a new way to create CSS layouts, CSS Grid is definitely worth considering.
It takes time to learn CSS Grid but don’t give up, there’s a fun way now
CSS Grid is a powerful layout tool for web developers, but it can be tricky to learn. For junior developers, the process can be even more daunting. That’s where CSS Grid Garden comes in! This fun and interactive game makes it easy to understand CSS Grid, and makes the learning process enjoyable. With CSS Grid Garden, players learn by completing progressively more challenging levels. As they advance, they build up their skills and confidence, until they are ready to take on real-world projects. CSS Grid Garden is the perfect way for junior developers to learn CSS Grid – it’s easy, it’s fun, and it gets results!

At the time of writing this there are 28 levels that teach you CSS grid from basic to advanced concepts. The levels are colorful and fun as well.
It’s completely free and offers an easy to use built in css editor that updates in real time.
How many levels can you complete? Try the game by visiting https://cssgridgarden.com/
I just learned about this setting after finally getting frustrated of clicking “Proceed.” Geez I wish I knew about this simple setting long ago… so much time wasted! I do lots of local development and we’ve had team members include ssl certs in repositories, or type in the following command “thisisunsafe”, etc. Who knew the solution was so simple 👍
Now we can simply get around that by copying and pasting the following command into your browser
chrome://flags/#allow-insecure-localhostYou will then be taken to Chrome’s development flags page. Simply enable it and restart Chrome
Now you’re all set to kick up a local dev server and never have to click proceed ever again.

If you’re looking for a great screen recording software that is free and easy to use on a mac, giphy.com’s screen recorder is a great option. It’s completely free to use, and it has a ton of great features.
Just head to giphy.com and download giphy capture. Then, select the area of your screen that you want to record. You can also choose to record your entire screen or just a portion of it. The giphy.com recorder also lets you choose whether or not to include audio in your recording. If you choose to include audio, you can either record your own voice with a microphone or use the system audio. This is great if you want to record a video tutorial or walkthrough.